|
Last Updated: July 30th 2005
TUTORIAL
So in short,
what's TheKingOfSpades.com? Unlike other browser-based games like Outwar or Utopia, this is more than just a "browser" game of straightforward rules and simple "click and wait" game system. TheKingOfSpades.com game is a sophisticated system of economics, technology, education, arts and relationships from one side, and an intricate system of battle, quests, missions and teams from another. Moreover, we dare you to BE. Many have asked what that analogy stands for, we say: It's whatever you want it to mean. True, the game is still in it's baby beta-test stages where not a lot of modules are up yet, but as the game progresses, you will see that it gives new meaning to Role-Playing. No longer are you going to be constricted to the limitations presented by MUDs, namely, a limit on what you can do, build and where you can do it, and no longer will you be subjected to the monotonous "click and wait" systems of other browser-based games, but you will be able to do whatever it is you want to do. The Level
System There are twenty two levels to complete (from zero to twenty-one), these are based on the Major Aracana of the Tarot cards. These are arranged thus: 0- The Fool Each Level is divided into four requirements. You need to complete each of the requirements in order to step onto the next level which entails answering a riddle or a puzzle to prove that you are worthy enough to gain in level. Depending on what alignment you are the cards can be exalted (for the Idealists and Karmics) or reversed (for the Anarchists and the Malignants), to represent whether you are in the Positive or Negative end of the spectrum. The four requirements
represent the Token of Symbols, they are thus: Which means that you will
be going on: Although this guide is based in New York City as a starting city, it is valid for any city in the game. In order to find the particular shop type that you need to find, merely use your City Guide (click on [Data] -> [City Guide]) and find the shop type you're looking for and its location. Rise and shine! So you're done creating your character and you wake up to a new morning in Brooklyn, New York City. Now what? Well the most important thing to do is to be aware of your surroundings and your interface.
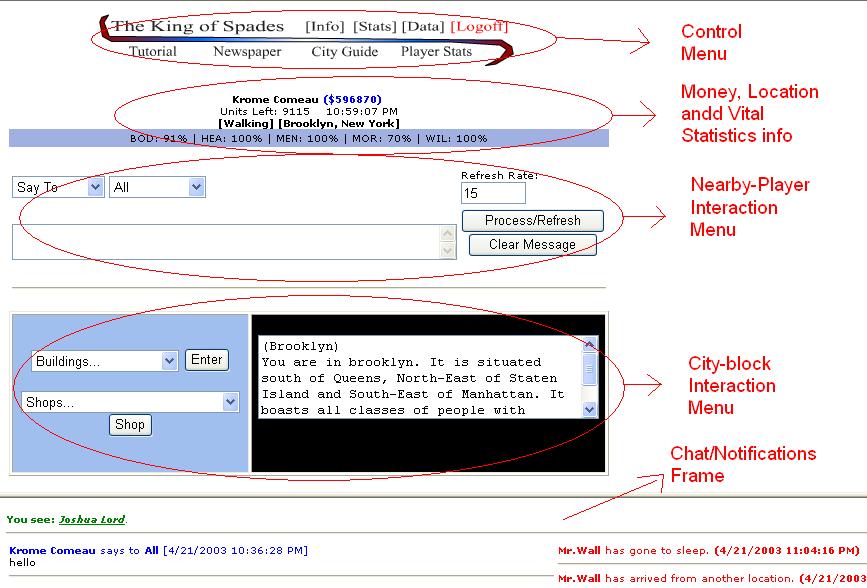
The above is how a typical King of Spades screen looks like. The interface is divided into two frames.
A- The Control Menu:
B- Money, Location and Vital Statistics Info: C- Nearby-Player Interaction Menu.
D- City-Block Interaction Menu. Secondly, the right half is a free space, which displays Sub-Menus (for example, Inventory, Item Usage, List of Skills, etc.) The bottom frame is called the
Chat/Notification Frame, this is divided into two halves.
The right half of this frame merely informs you of any arrivals/departures, whether it be new players, players travelling to other city blocks, players being kicked off the server by a gamemaster, etc. Get equipped. Our tutorial is based in New York because it was the first "City" that the game started with. As of the date of updating this tutorial, there are 47 cities registered in the United Nations Land Regulation Agency (UNLRA) and about 100 secret coordinate lands in 7 different realms that are Team bases, recluses or quest/mission locations. If the city that you've started in is not New York, you can use the City Guide to find alternative shops than the ones shown in this guide. (The shops may have different names, but as long as they are the same shop type, it doesn't matter what city they're in. The only difference is that training in your ethnic home city gives you almost twice as much skill boosts as it would if you were in another city). Now, let's begin. Get acquainted to the people around you, see who's around in brooklyn and chat. Get a hang of the Whisper, Say To All, and Say To... commands. As easy as they may seem, you need to get used to that kind of layout, because almost every command and options are selected with this simple interface: Drop down menus and buttons. You don't have to memorize any commands. If you can't do it, there won't be an option to select it... This also allows for a more visual interface, as images are implemented into the objects in the game, descriptions will be in both text AND graphics, adding to the realism and playability of the game. Let's try buying an item. In your city block menu, click on your Shops.... drop-down menu and select Stella's Weapons and Equipment, then click Shop to enter that store. Note that if you're not in New York City, open your City Guide (Click on Data - City Guide) then look for the nearest Millitary Gear Store (to make it easier to find something on this page, press CTRL + F (to open your Find dialogue box) and enter "Military" or "Gear" in the search, once you find the location, head there by going into the Bus Station and selecting that location in the Bus Station's drop down list).
Click on Items for
sale... And pick Night Stick
. You should see the description of the night stick on the right box
(if you cannot see it, I suggest you get the latest version of Internet
Explorer which works best with TheKingOfSpades game). Now let's take a look at our new weapon. Click on Info on your Control Menu then click on Inventory. You should see a more detailed info of yourself on the right box of the Control Frame, in fact, your image, biography/description, state, occupation, ethnicity, faith, hobby and sport can be examined by other players, therefore learning more about who you are and whether they share the same interests as yourself. To see what you look like to other players when you're in superbeing mode, click on [CHANGE INTO SUPER-BEING MODE] as if you've changed into a completely different person, now the information displayed will be your super-being's biography and description, totally separate from your alter-ego's information. Make sure when you type a description not to give any clues on who your other ego is, this will prove vital for your personal security. Under your description, you will see a symbol. This is your alignment. If you are an idealist (Positive), you will see a scales symbol. If you are karmic (Neutral left) you will see a Yin-Yang symbol. If you are an anarchist (Neutral right) you will see an Anarchy "A" symbol. And if you are Malignant (Negative) you will see a red skull symbol. Knowing your alignment is important in many ways. Your alignment determines who your degree angel (also known as Herald) is. If you are idealist, it's Aryel, Herald of the Devic Kingdom. If you are karmic, it's Tetra, Herald of Babylon. If you are anarchist, it's Raziel, Herald of Atlantis and finally if you are malignant, it's Neria, Herald of Hades. Your Herald is important in two ways: 1- He or She will test you on your 22-levels of ascension. 2- He or she will assign missions for you to perform. These missions will boost you mentally and physically and will ultimately provide intel on where the element's royal tokens are. You'll notice that your super-being displays the Team information and the level, that's because only your superbeing's ego is affiliated with a team, and it's that ego that will ascend. Your alter-ego on the other hand is responsible for learning and training their various, non-superpower skills. The idea is to separate the two egos... With practice, you will get used to this strange but vital concept. As you switch from one ego to the other, no one will be notified of your transformation, but some may notice that your alter ego has dissapeared and "someone else" has showed up instead, so make sure you do your transformations when a lot of people are around (so that no one can notice a sudden change), or better still, when no one's around. This is where a room or a quick run into an empty building can be useful. Be careful, however, as some stores do not allow super beings to enter out of fear. Likewise, some stores, such as the Team Bureau only allows you to join teams or create teams if you're in superbeing mode. You'll get to know what these different shops are with time. Now click on [CHANGE INTO ALTER-EGO MODE] to revert back to your normal form. You may be shocked to see that you are Jobless right now, but no matter, we should get you started on finding a job fairly soon. Now scroll further down and you should see two drop down menus. One that says Carried Items and another that says Equipped Items. A carried item can be a book, cloth, weapon or device that awaits to be used. Accessing a Carried Item allows you to get further details on it (go ahead and try it on the night stick), you will now see that it can cause an average of 6 damage per hit (since it's a melee weapon, your physical strength adds to how much damage you can cause, if it's a gun, your marksmanship adds to how much damage it can cause and so on...). Now click on wield to carry it on one of your free hands (You can wield two items, such as a weapon, at a time, as long as they are both one-handed items). Now the small list of items/equipment worn should update to include the nightstick as a carried item. Click on Done to close this info box. Now that we have a weapon, let's get some armor. Since we're still in Stella's Weapons and Equipment store, click on the shopping menu and buy yourself a Bullet-Proof Vest. Likewise, click on Info, Inventory and Access the Bullet-proof vest. You will notice on your body list that the section Chest is highlighted with red, this means that this part of your body is vacant to accomodate this equipment (or in this case, armor). So click on Wear. Now you are the happy wearer of a bullet-proof vest and can breath easier knowing that you won't fall dead as easy! You will also notice that your +DEF (Armor Defence) has increased, which is good. Later, as you gain more money, you can invest on more armor for your body, including head, back and legs armor. Lo and Behold! The other important thing in your inventory menu is the change bio/portrait link, this allows you to customize your character further. You can write two biographies of your character: one for each ego, they can be as long as you want, just don't make them boring, which will help team leaders pick you for their team, or making new friends, or intimidating members of opposing guilds/teams, it's upto you how you use your personal biography. You can also link two addresses (URLs) of images (a superbeing image and a normal/alter-ego image) to your character to make yourself more "rememberable" and colorful. Both these customizations are optional. Woops. Wrong Room.
However, when you are in a building, things are
more private. The second drop down menu (only visible if there are NPCs, or Non-Playing Characters in the room) will show you what NPCs you can communicate with. In this case, the receptionist. Personal InfoNow that you're familiar with your surroundings, we can move onto the technicalities of the Control Menu . First of all, the personal information button, this will bring up your comms , team information, your job information, your vehicles information and your inventory . Since you don't have friends, a team, job or vehicle at the moment, the first four won't be very useful as of yet. The fourth button is your inventory, which we've already tackled to an extent. This brings up your personal description, biography and information (depending on whether you're in normal or superbeing mode), your carried items (to look at and equip your items), your worn items (to look at and unequip your items), the amount of weight units (WU) being carried and how much more you can carry. And finally, an option to change your being's mode and the biography/portraits. Vital Statistics For example, if you click on Stats then Attributes , it will bring up your attribute stats, from your body and health to your determination and leadership. Clicking on each attribute will give you a description on that attribute and how it's related to your well-being. Secondly, Skills will show you the skills that you've picked at character creation. Free members can have upto 20 skill slots (you start with around 5 skills). Premium members can have more skill slots than 20. You learn a new skill or practice an existing skill by going to a shop that offers that skill, and training an amount of training units (TrUs) in there. Each training unit contributes to 1 skill point (SP) depending on how good and fast you learn. (More on specifics of training in the Getting A Job section of this tutorial) You can find out where to go for training a particular (or new) skill by clicking on that skill. For example, if you want to practice Balance (which is a street or Wisdom skill), clicking on Balance (or if you don't have that skill, click on Show All Skills first then find Balance ) will inform you that balance costs $15 TUs at any Dojo, it also goes on to tell you that the closest Dojo you can find is The Highlands Dojo in the Bronx. But what about the part that it tells you that you can ONLY learn upto 50 skill points? Well that's common. A skill cannot be mastered just by learning from someone else, the skill has to be PRACTICED in order to master it, therefore, in order to excel in "balance", you need to be in a situation (whether in a battle or a quest) where you have to command your balance skills, doing it will increase your skills, more with success than with failure. Thirdly, Combat skills, just like skills, only they are used only during combat, regardless of whether you are in normal or super being mode (that is why combat skills are stressed sometimes more than superpowers, which can only be used in super being mode). Free players have upto 3 combat skill slots (and you start with none). Premium players can have more. Setting a default Combat skill will let you automatically go into that combat mode when you get into a sudden fight (as switching combat stances will cost you battle units) Fourth, Superpowers . At the end of the day, when someone dares to cross paths with you, you need to show them what you're made of, that's where your superpowers come in. However, unlike skills and combat, new superpowers cannot be earned, except with upgrading your premium account. All players start with 5 superhero slots which are immediately filled. Since there are no "schools" where you can go to train your superpowers. The only way to increase them is by fighting or practice, that is, use them in the field, in quests and in your bases' training facilities. Game Data First, the Tutorial , this is a link that provides you access to the Game Introduction, FAQ, News, Tutorial and most importantly, Rulebook, which many people find interesting to read before they delve into the game. This sheds light on many elements already in the game, and some that are to be implemented in the near future. Secondly, the Newspaper . This gives you access to the in-game newspaper "The Straight Flush" in there you can find interviews on daily happenings, quest and alternate-realm info and important events written in an in-game language, rather than the technical language you may find in the Game News page or the Tutorial. Thirdly, the City Guide . This is an important "Quick Reference" to the various parts of the city you're currently in (e.g. New York City), its different shops and buildings and most importantly WHAT they are and WHERE they can be located. To move from one city block or the other, you usually take a bus ride or drive your car down there. This City Guide is also useful in a larger scale because you can click on "Return to World Guide" to see all cities that are registered under the United Nations Land Regulatory Agency. These cities can all be reached by driving, flying or (sometimes) sailing there. Fourth and last, Player Stats. This is a screen that shows you many different Rankings: Firstly, the Royal Rankings. This is concerned with the advanced players of TheKingOfSpades.com, namely the ones who've ascended (passed the 22 levels of ascension) and have gained control of one of 16 tokens of the game, including the 12 CROWN (King, Queen and Jack) tokens. This screen also tells you the names of these tokens, as per the information given in TheKingOfSpades.com book so far. Secondly, the Personal Rankings. This gives you information on many different aspects of player ranks, including, the richest players, the most skilled players, the most powerful superbeings, and even a list of all people and superbeings in the game. Finally, the Team Rankings . This gives you information on team ranks, including the richest teams, the most skilled teams, and highest teams in terms of KOs (KnockOuts) and kills scored by members. I present to you.... The
Janitor! Many people do it in different ways. Some
would rather just be jobless while they loan money from friends
or the bank then spend that money practicing skills for
a good-paying job after which they can pay off the loans. Others
don't like to beg and would rather land a shitty job first
to get enough money to pay for their tuitions. Others are lucky. They
start off with enough skills to already start a good paying
job, although lower-level jobs, they are nevertheless decent enough, and they
spend their money developing skills for higher level jobs (e.g.
Security Guard then Police Officer then Detective then Police Chief/Secret Agent for example). Some
career paths can branch out. For example, you can be
a Secret Agent whether you start off as a
Police Officer or a Naval Officer, since the ending required skills are
what matters, not your previous
job. Note that in order to apply for a high-level job you have to be old enough. For example, Newcomers (newbies) can apply for a Police Officer job as soon as they qualify skill-wise, however they can't apply for a Lawyer job until they are at least Middle-Aged (100 days or more), subsequently they can't apply for a Judge job until they become Senior (200 days or more).
Here's a break down to how that is calculated: The Agency Inside you have three options: List All Jobs, Jobs
I'm Skilled With and My Job. Take a look at the different job paths and see what interests you. Note what skills are needed for the jobs that you like and compare that to the skills you have (the agency will automatically list both the job's skills and your skills on the box for convenient comparison). Again, if you need to know where you need to go to learn a particular skill, just click on it and it'll notify you of where the closest institution that teaches that skill is. The high-paying job you are drooling about right now is probably not likely until much later in the game. So, let's click on Jobs I'm Skilled With. What's this you wonder? These are the jobs that you have related skills in. True some jobs you may not be qualified for, but these are the closest jobs you can get for the particular skills you have right now. As you learn new skills, you'll see more jobs in this list. Click on any job. Right above where it says "Return to List" it should tell you whether you qualify for the job or not. If you qualify, you can click on Apply for this job and immediately get the job if you are not currently registered in any job (i.e. you need to quit your existing job before you apply for another). If you can't apply yet, compare the job's skill requirements and your skills, see where you need improvement and note it down. If the job requires a skill that you don't have, you can "add" a new skill to your knowledge-base, just the same way as you would train any existing skill, so long as you have enough skill slots. Here's the easiest example, click on List All Jobs (do this if you don't qualify for any jobs yet), find Janitor, which is a job that anyone in any alignment can apply for. The requirements is simply 1 Chemistry (you need to know about the different chemicals used for cleaning and the simple safety precautions you need to take). Click on Chemistry to see where you need to go to learn it (assuming you don't have any chemistry knowledge). Ahh, we need to go to the Brooklyn High School to learn the skill, and it's going to cost you $80 to learn, which is how much you'll be earning everyday. In fact, salary is directly related to how much effort and money you spend learning the skills required for it. As of writing this tutorial, salary is paid out daily when you log into the game. The School The second thing to know is that the number of Training Units you can buy at a time is directly related to how much determination you have. You can learn the integer value of 1.5 times the number of determination units you have. For example, if your determination is 2, you can only buy 3 TrU at a time, and if your determination is 7 you can learn upto 10 TrU at a time. Therefore if you need to have more training units at a time, you need to increase your determination, for example, in battle (Consult the rulebook for more information). So enter the maximum number of training units you can buy and click on Learn. Now sit back as your character trains. Chat with other players, go get coffee or plan out your future as you wait. Note that if you're training you cannot shop, battle or move away from the shop, if you need to stop click on Stop Training , however, do that only if it's an emergency because you DON'T get a refund! As the minutes go by, your training completes. You get a message saying "You've learned X Training Units." therefore you've learned from 0 to X Skill Points (usually you're not good enough to convert ALL of your TrU's to SPs unless you have high wisdom or intelligence). If you haven't made the 1 Skill Point yet, train again, until you get it. Now head back to the job agency, find the janitor job and apply for it. Welcome to your first job! MAKING FRIENDS AND JOINING A TEAM Hi, my name is Mitch. What's
yours? Walk around, say you find a nice guy called Andrew. Get to know him. Click on him and see his interests, you share the same hobby, a good conversation starter. You guys click, you're new buddies! Now put it down in concrete: Click on that character and scroll down till you see "You are not related to this person", now let's change that. Scroll down the relationships list and pick "Buddy", then click on Set. Now you have a friend, and you will be able to stay in touch in two ways: The Comms in your Information Screen, this will give you a list of people you have relationships with (remember each of their super and normal egos are just like knowing two different people, so you might be buddies with the alter ego, but are not related to his super being ego). In the Comms list, you will be able to tell whether your friend is online (But you won't know WHERE unless you have some sort of superpower or skill that can give away where he is). Also, if both of you are mutually amicable (i.e. you've both set each other as friends, love interests, dating, etc.) AND if you both have a cellphone, you will be able to stay in touch more closely. Alternatively, if you can't find anyone (who is not an NPC) in your city, try using your Alignment Chat which can be turned on if you click on [Info] -> [Inventory] then press the "Alignment Chat On" button. Now you can communicate back and forth with whoever has their alignment chat on. Another way to meet people is to get on the KOS Forums and post or read messages in there. Ask your new friend if he knows of any good teams. Once you think you've found a suitable one, you'll need to make a short drive to another part of the city. The Bronx... Head down to the Brooklyn Bus Station and buy a ticket to The Bronx. The Teams Bureau Good Morning Mr. Hunt... First, Missions. Your herald gives you missions depending on how big your team is. Missions range in difficulty from Basic, Conventional or Epic. Basic missions are for small teams and solo players. Conventional and Epic missions are for bigger and more experienced teams. The team leader accesses the Herald's Mission Briefing center and will download Missions that he finds will be useful for the team. Downloading a mission will "reserve" that mission to that team and they will have a specific amount of time to complete it. Missions are usually divided into components so that the leader and co-leader can decide who has expertise and skills to complete a specific component. Missions can range from something as simple as taking a photograph of Mika Wolfgang's documents in her office at the CityHub9 nightclub, to a complex mission of researching peculiar tectonic movements on an island in the pacific. Completing a successful mission will unlock new missions and reward each participant with a Spades Coin (just as completing a Quest will reward you with a Clubs Coin). This coin is saved up and redeemed when you have collected all four coins (a Spade, a Diamond, a Club and a Heart) for a Level Upgrade, this of course, will only be accessible when the Level System and the Missions Module is complete. Second, Security . Bases and safehouses are places where team-members can live, train, develop technologies and build things. Usually team members sleep and wake up in these safe-houses, therefore they are exposed to each other constantly, which is vital for building trust and strong bonds between different team members. Any team member can purchase buildings and assign it to the team, where it becomes a permanent Team Asset. From then on, access can be given to different people and duties can be assigned. For example, a team can assign someone to research Hologram technology, then that technology can be used to build a Holodeck by an architect. (Note that Research and Manufacturing not yet enabled) This Holodeck will then be used by all team members to further their different superpowers and fighting skills. Third, Assets . Assets can be structural (land, buildings), monetary (money), intellectual (technology) and mobile (rigs that is vehicles). All Assets are "sacred" to each team. Improper use of assets are punishable by the team and exploiting assets to other teams or worse, other alignments are subject to punishments from the Heralds themselves. In the above example, the building was a structural asset bought for the team, team money was then used to research and develop hologram technology (which becomes intellectual property of the team) and finally the Holodeck becomes structural property as well. Likewise, vehicles can be bought by team members then set to be a Team Asset where instead of just the owner being a driver, now any member of the team can drive it (provided they have enough driving skills). I Found It! When you've decided on your team name and the team charter (that's the rules of the team), then you can head on the Team Bureau and select Establish A Team , to start a new team. Follow the instructions, and good luck! VEHICLES, BUILDINGS AND COMBAT COMBAT WEAPONS VEHICLES BUILDINGS GUILDS FAQ
|